
URBAN DECAY NAKED BASICS 1
Review & tutorial!
So this is what I expected when I purchased this palette. Sounds and looks good right? Seems simple enough. I like the in depth fifteen minutes to do eye shadow alone looks but as a woman and mother I need a quick every day eye look. I have a few but I like to have as many as I can so I don't have to always look the same. So anyway, as I said, this was the idea:


I went to Sephora yesterday and bought this palette after looking at many of the palettes they had and coming to this decision so I could spend $55 on this and a lipstick and not just a palette. I have lots of palettes so it's not like this was my first and only so I didn't need a huge palette. I also bought a Too Faced Melted Matte lipstick in the color Queen B (review and tips to come soon.). I also spent 200 points on a Too Faced Better Than Sex Mascara sample (review in previous blog.) And a BITE lipstick sample in Gazpacho (review to come soon.).

So basically I snuck a few uses of this when I was over at my mother in laws. Her daughter is like 21 and has a few high end lipsticks and this is her only high end eyeshadow palette. I looked inside and I thought the colors looked really pretty. I can't remember a time where I seen her wearing it or with much makeup on at all, but then again I don't really look at her so that's not saying much. Anyway, while giving my son a bath in the bathroom where her makeup is I used this palette and her lock it foundation (these times are when I fell in love with the lock it powder of kvd.) And a few high end lipsticks I hadn't had the pleasure of trying since I'm a lipgloss and eyes girl. Lipsticks have been much ignored in my makeup repertoire up until lately.
So during these times when I needed a serious makeup touch up and nothing on hand her makeup came to be a life saver. I used her Naked Basics 1 on two different occasions and I liked it a lot. Admittedly, during these test it days I was wearing other makeup that had faded in close to the same colors so I guess I wasn't getting a great idea of how it worked but I really thought "how much of a difference could a little rubbed off makeup in the background make?". Well, turns out a lot.
I will post pictures below this paragraph to prive what I found and that after looking I seen it in other peoples swatch and looks pictures. This palette was horrible. I'm a big Urban Decay shadow fan. Actually, I like most of their makeup. I just bought their anti aging eye primer today! This palette unfortunately left a lot to be desired. It could probably be made to work with a lot of dips in the pan to get the color and a lot of blending but honestly for $30 dollars for the amount of shadow that it is I'm just not willing to work that hard and even if I was the colors leave a lot to be desired. Despite this I made a tutorial below anyway but first let me explain in a little more detail what the actual problems were. I don't use drugstore eyeshadow since over the last two years I have invested in quite a few palettes so I can have a good variety of colors and finishes. The palettes I own are Naked palette 1 and 3, Smashbox Full Exposure, Cargo Northern Lights, Too Faced Bon Bons, and Kat Von D Serpentina. These are just the ones I use often and these are the palettes I'm comparing the quality too because this is the quality I'm used to. If this basics palette is the first high end palette you've used or bought ever or in a while and you mostly use drugstore makeup I can see how your opinion may differ from mine.
The problems:
The colors are extremely powdery with an abnormal amount of kick up and fall out and even with primer and moisturiser still looks very powdery and falls out all under and around eyes. All colors in palette do this. Kick up is expected when using a brush of any kind, but more with some brush types than others. A lot of makeup users are under the mistaken impression that there should be no pick up or fall out. That is usually the case with drug store makeup but when dealing with most high end powders they are extremely fine milled powders. The ease of which they come off the pan and brush is a good thing and so is some kick up but sometimes it's too much if there's an extremely fine milled powder that isn't buttery at all and is just powdery. If that's the case, as it is here, you're lucky if most of it makes it to or stays on your lid.
Next and possibly the worst problem of all the colors are extremely streaky. That's if you can get the color to show at all because the pigmentation down to the very darkest color sucks balls. When you look at the pictures below you can see that the color is never even on swatches or on the eye. Whether you use your finger, a brush, primer, no primer, tips, tricks, etc. Doesn't matter. As I said above the only way to combat this is to use a ton of product and blend for hours. Let's hope your eyes don't fall out in the process. I personally wasn't willing to waste my time when I'm spending that kind of money vs. The amount of product I'm actually getting. To use it correctly I would have maybe gotten twenty uses out of it before I started running out of color.
Again, the pigmentation is horrible. The second, third and fourth color all barely show up at all and if I could make them it's with a ton of product. I'm a very light skinned girl with pink undertones. Anything will show up on my skin except for this so I imagine it's worse on everyone else. The highlight is ok but it doesn't have as much of a highlight as I would like. I would think of this as being more of a base color. The two darkest (the last two colors.) Colors are horrible. The second to last being the darkest brown is ok but it's so streaky I can't stand it. The black is not what I would consider a black. It's like a see through black if that makes any sense and since I like my darkest color to double as a liner this wasn't cutting it for any possible uses.
The staying power sucked. With the Mary Kay Eye Primer I had been using before I purchased today's primer it stayed in for maybe a couple hours before the streaks got so evident that it was embarassing and I had to add colors from other palettes which just made it look more muddy. Unfortunately that was my second idea of a use for this palette. Using it as transition colors or adding other palettes to this palette look for a Better look but with how muddy and gross it looked I wasn't wasting any more time on this.
There's nothing good about this palette. I hated it. The foxy color is kinda pretty, the small travel sized palette would be great as a take along for day to day or travel, it closes tight and the silky rubber type feel of the casing is cool along with the understated design. Unfortunately though, none of those things could save this palette from being returned for me. I wouldn't recommend to a friend and I wouldn't ever try another Basics palette.
I returned it for an exchange on the Tarte Tartelette In Bloom Palette and just paid the difference since it was worth it for more colors, more quantity in weight and shadows and way more quality. For $15 more dollars it's a lot better deal. I haven't got to use it yet but the swatches are beautiful. I will review and add tutorials for that soon.
The basics tutorial starts below but first here's the problems I found even in other bloggers pictures and with my own experience:
First here's the proof of the lack of pigmentation and the extremely streaky color both on swatches and on the looks. This palette in the first picture below is the "NB" on the left.


It took a ton of product and blending for the above look and the streakiness in the crease is still evident.
The pigmentation sucks. I guess if you want to spend more than $30 with tax and maybe shipping on one natural, barely there look and that's your thing than go for it. Last but not least:

Look at how much product has to be used in these swatches for a uniform look and color. You can see it's so thick. Also the extreme powdery look is so obvious. Not sexy.
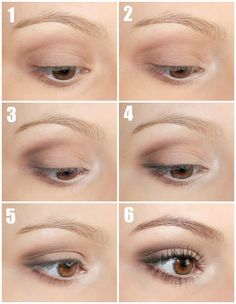
Here's the tutorial. I'm not sexy because it was a hot, sweaty day and I didn't retouch these photos at all because I want you always to see the products I use for exactly how they are. So let's begin:
Step one: wash face, add foundation or concealer on eye from lash line to eyebrow. Then do eyebrows and then add base shade. The second shade lightly with a fluffy brush from lash to brow.

Step two: use your fluffy brush to add the third shade from the left, so the third darkest shade. Use a windshield wiping motion. It doesn't need to be perfect or clean. We will clean up later.


Step three: add the fourth darkest shade, fourth in from the left to your fluffy brush. Start with small circular motions in your outer third then blend with windshield wiper motion in same as before. We will be coloring our crease from end to end of crease unless stated otherwise.

Step four: add fifth darkest shade, fifth shade from left, to your fluffy brush and put it in your outer third. Now blend into crease and a little outward towards hair line.

Step 5: with fluffy brush add darkest shade, creep, into outer v and then blend into outer third only then add foxy with a shadow brush into inner two thirds. Make sure any harsh lines are blended. Use the third darkest color on top of the crease again to blend any streaks or harsh lines.

Step six: add creep to your angled or straight edgge liner brush and draw a wing. Keep adding color until you get the look you want. Add liner on top of this isn't dark enough.

Step seven: add mascara, foundation, contour, highlight and blend. Then highlight under eyebrow and inner eye corner with first shade in palette, the highlight shade. Add lipstick if desired. Products I used are;
& Anastasia Beverly Hills brow duo brush #14 for liner
&UD Basics Palette 1
& Benefit My Brow pencil in #3
&Too Faced Melted Matte lipstick in Queen B
& KVD ink liner in trooper
& KVD Lock it powder in Medium 54
Barely used any because now that I quit tanning it doesn't match so I only just barely cover up my flaws with it until my new color gets here on Wednesday in my Sephora shipment.
& Too Faced Better Than Sex Mascara
& Loreal Telescopic Mascara since as I've blogged about before layering two different mascaras gives a huge lash look.
& Cover Fx Contour kit in light
& Bobbi brown concealer duo for under eyes and on eyes as a base
Yes my acne is showing. I was not going out and I would be in bed in a couple hours so trying out the basics palette was the main focus. Here's the look:


Twitter @snowbunnybeth90 pinterest @callowayelizabeth Facebook page is yarnandbeauty Instagram @buzzybee1990
Youtube to come soon.
Mirroring blogs at
Yarnandbeauty.blogspot.com
Yarnandbeauty.wordpress.com
No comments:
Post a Comment