


Tip for a clean line if you don't trust yourself to be able to wipe it properly with a wipe at the end:
First you want to do all your prepping. You don't want to just wake up and start putting your makeup on because that's going to breed bacteria in your makeup and on your brushes and sponges. Your makeup also lasts longer and looks better if you use a clean and moisturized but oil free "canvas." So wash your face and moisturize or whatever your skin care regimen is. I use the proactive system usually but lately I've had to use st ives exfoliating scrub and proactives advanced oil control lotion to help control my oil output since that all but wipes out my makeup by mid day. Also don't do your face makeup until after your eyes are done because every eyeshadow has some fall out and even If you can't see it it makes a dark shadow under and on the side of your eyes. We will clean up and I can and will prove this to you later on.
Also, unless otherwise specified use your crease brush in a back and forth windshield wiping motion just at the top of and above your natural crease. This widens your eyes, especially if you have hooded eyes. If you for some reason want your eyes to look smaller just keep it in your natural crease. THEN when you're in your outer third and outer V you will use your crease brush or fluffy blending brush or whatever brush you prefer and apply eyeshadow in small, fluffy, circular motions. Next, when you're applying to your lid (the inner two thirds of your eye lid), your inner v and your inner eye area next to your nose you will use a soft patting motion. In your arch, waterline, anywhere you put eyeliner, you will use a drawing motion. You will literally be drawing straight lines. You can use that same liner brush or thin shadow brush to blend the arch back and forth after that. In your under eyebrow area under your brow but right at the top of your crease color you will use a large fluffy brush and a soft and wide swiping outward motion. You will also always tap off excess shadow with each dip into your makeup because the idea is to slowly build and blend colors not accidentally add too much and try to figure out a way to fix it. It just looks nicer this way. Don't forget unless otherwise specified you always blend your shadows after application. If your asked to blend from the outer v into the crease you will start with small circular motions then move into windshield wiper motion. You always blend in the manner you applied.
Next add concealer on your lids to right under your brows. Then add a colorless eye or face primer to your brows and do your brows as usual and then set them with a setting powder and line all around the edges of the brow, but only on your skin with concealer and blend in carefully. All of these things help keep brows in place all day. Then add eye primer to your lids.

Step Two: With your crease brush grab Almond Truffle and put just above the natural crease. Blend. Next put Mocha in the same place. Blend.
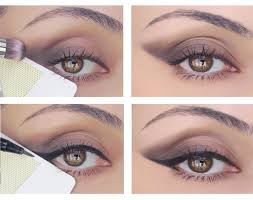
This would be in what this diagram shows is the medium grey colored area just above the natural crease below the lightest color:

Step Three:
Put Divinity on the lid and flick it outward all over the lid and natural crease. See how they flick it out in picture three below? Like that. Now you can leave it exactly like this or add Divinity on top for a more glammed out look.

Step Four: now with your fluffy blending brush grab divinity or Cashew Chew Or your fav Powder foundation and put above top of crease color to arch of brow. Then add divinity or your fav highlight shade in arch of brow and inner V and inner eye on side of nose. Then use Divinity or a white liner to line the bottom waterline from inner V to lash line but not over lashes.


Step Five: With your liner brush grab Bordeaux and line bottom lashes only. No further. Then tight line top lashes as pictured below.


Step Six: Now grab your liquid liner, black eyeshadow and liner brush. This all needs to be ready right when you start. Apply liquid winged liner and then immediately apply black shadow over top of that from the inside out with a kind of dabbing/drawing motion. This prevents any bleeding of color into eye shadow or lines and also makes your liner last way longer without smudging. Then add mascara or lashes. I use two coats each of two different mascaras for a big look on my stubby blonde lashes.


Finishing: I Then add foundation from the middle of the face outward then conceal under eye area and acne. I use my fingers for concealing acne because I don't want that all over my brushes or bacteria from my brushes all over that. Then add contour. I "nontour" lightly on my cheeks and nose. Then add blush only on apples of cheeks then blend outward and upwards towards temples then add highlight on cheekbones up around the temples then bridge of nose and mid forehead and chin and also cupids bow above lip. I also add a little under brow arch and inner eye and neck and top of breasts to tie everything together depending what's showing. I Then grab a sponge and pat it all down a few times to blend it all nicely.


Makeup used:
TOO FACED:
Chocolate Bon Bons Palette
Better Than Sex Mascara
KVD
Ink Liner In Trooper
Lock It Powder in Med 52
ABH
Brow Duo Brush Straight Cut #20 For brows
LIQUID LIPSTICK in Crush
BROW duo brush angled cut #14 for liner
Glow Kit in Sundipped
Makeup Forever HD Blush #210
DIORSHOW Mascara
CoverFX Contour Kit in Light
Urban Decay Buck Shadow for brows because I'm out of the Benefit Precisely My Brow Pencil in color #3 which would always be my preference
Stay beautiful because that's exactly what you are!
Twitter snowbunnybeth90 pinterest callowayelizabeth instagram buzzybee25 facebook.com/YARNANDBEAUTY YARNANDBEAUTY.BLOGSPOT.com YARNANDBEAUTY.wordpress.com
We aren't too far away from our high end beauty giveaways! We are half way there and it's only been a month! Keep sharing and following babes!
No comments:
Post a Comment