


Palette (to be reviewed right after this post):

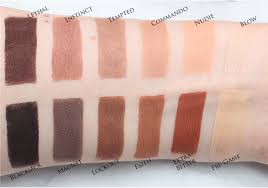
Swatches if you don't own the palette but own similar colors:
This will be the areas of placement I'm talking about when I mention an area:

Techniques for a clean line if you need help (can do the same exact thing with any straight edge but tape works especially well since it holds itself to your skin):

TUTORIAL:
Also, unless otherwise specified use your crease brush in a back and forth windshield wiping motion just at the top of and above your natural crease. This widens your eyes, especially if you have hooded eyes. If you for some reason want your eyes to look smaller just keep it in your natural crease. THEN when you're in your outer third and outer V you will use your crease brush or fluffy blending brush or whatever brush you prefer and apply eyeshadow in small, fluffy, circular motions. Next, when you're applying to your lid (the inner two thirds of your eye lid), your inner v and your inner eye area next to your nose you will use a soft patting motion. In your arch, waterline, anywhere you put eyeliner, you will use a drawing motion. You will literally be drawing straight lines. You can use that same liner brush or thin shadow brush to blend the arch back and forth after that. In your under eyebrow area under your brow but right at the top of your crease color you will use a large fluffy brush and a soft and wide swiping outward motion. You will also always tap off excess shadow with each dip into your makeup because the idea is to slowly build and blend colors not accidentally add too much and try to figure out a way to fix it. It just looks nicer this way. Don't forget unless otherwise specified you always blend your shadows after application. If your asked to blend from the outer v into the crease you will start with small circular motions then move into windshield wiper motion. You always blend in the manner you applied.
Next add concealer on your lids to right under your brows. Then add a colorless eye or face primer to your brows and do your brows as usual and then set them with a setting powder and line all around the edges of the brow, but only on your skin with concealer and blend in carefully. All of these things help keep brows in place all day. Then add eye primer to your lids.

Step Two: With your crease brush or medium sized eye brush, your included brush will work well, grab the color Commando and blend into just above natural crease.

Step Three: With same brush and in same area put the color Tempted.

Step Four: in outer third of eye and outer V put enough of the color Extra Bitter to make the orange really stand out then blend it into the natural crease and right above the natural crease going most of the way in.

Step Five: Blend again with the color instinct into crease to make sure it all transitions well.

Step Six: With a smaller eyeshadow brush grab the color Pre Game and put it in inner two thirds of eye. End that color where Extra Bitter starts. If at this time you want a better pop of Orange then add a little more Extra Bitter to the outer third and outer half of crease.
Step Seven: with a smaller eyeshadow or contour brush grab the color Lethal and outline your outer V. Kind of like drawing a sideways v from the end of your lashes to right inside your natural crease. Blend just to distort any sharp lines and blend it into crease but try to keep it where it is.

Step Eight: with a clean eyeshadow brush grab the color Blow and put in inner V.
Step Nine: with your powder foundation take a fluffy blending brush and swipe lightly from top of crease shade to under eyebrow. Then with smaller dense brush, like the smaller end of the included brush add blow under brow from arch to end of brow.


Step Ten: Grab lethal and a liner brush and tightline the top lashes or top waterline and line the bottom lashes only. Then with Blackjack line outer half of bottom waterline.


Step eleven: line a winged eyeliner with liquid eyeliner (preferably). Then with a clean liner brush grab the color Blow and line the inner half of your bottom waterline until lashes then continue lining it right under lashes to the end of your eye or until the end of the winged liner. Whichever you prefer.


Finishing:
Add your mascara. I add two coats each of two separate mascaras. A trick I learned a long time ago to give thick and long lashes better than any one mascara.
Now as usual add your foundation however you do that and your concealer on top of that. I conceal under eyes and acne. I use my fingers for concealing acne because I don't want to add bacteria to my acne or spread it elsewhere with a brush. Yuck. Now contour if you like. I like a "nontoured" look only on my cheeks and side of nose for every day. I like more of a highlight and a lot of contour and highlight is just too much for every day wear in my opinion. Then I add blush to the apples of my cheeks and blend outwards and upwards towards temples to elongate my round face. Then I highlight cheekbones to temples, mid nose, forehead, chin and above lip. Add lipstick. Make sure I blend everything in with my kabuki. Add a little bronzer to neck and chest and cleavage (whatever is showing) and a tiny bit of highlight to the top of my breasts so it doesn't look like I'm wearing a mask and I'm done!


Makeup used:

Naked ultimate basics palette
ANASTASIA BEVERLY HILLS
dipbrow pomade
Angled brow duo brush #14 for liner
Straight cut brow duo brush #20 for brows
Glow Kit in sundipped
KAT VON D
ink liner in Trooper
Lock it powder in med 52
Makeup Forever hd blush 210
Too Faced Better than sex mascara
Diorshow mascara
Makeup forever hd foundation in sand
Coverfx contour kit for contour and concealer in light
Smashbox always on liquid lipstick in stepping out
Hope you enjoyed! Sorry for the day or so break I took. Wanted to use all the makeup I got a little bit before I started reviewing and making tutorials and swatches.
Stay beautiful ladies!
Twitter snowbunnybeth90 pinterest callowayelizabeth instagram buzzybee25 facebook.com/YARNANDBEAUTY YARNANDBEAUTY.BLOGSPOT.com
YARNANDBEAUTY.wordpress.com
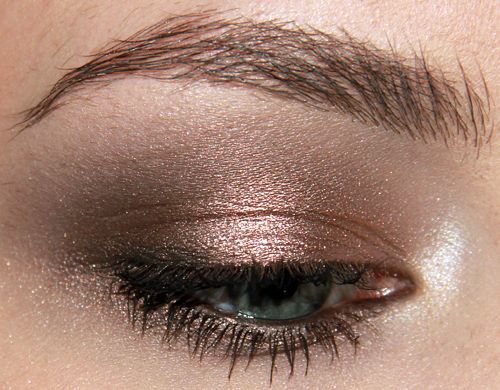
Finished look:


No comments:
Post a Comment