Tuesday, September 6, 2016

BITE Amuse Bouche Lipstick Review and Lip Swatches!


     BITE AMUSE BOUCHE REVIEW!

I got this as a sample during my shopping trip to Sephora two days ago. It cost me 100 points and it's tiny as hell, but it's a great way to try lipstick out, or anything for that matter before spending the money on it. This isnt $6 Loreal after all. 

I did my makeup as usual but with my new Tarte Tartelette In Bloom Palette. After I finished with that and my full face I took the makeup out of my dresser drawer and opened it up. The casing is very cool looking. It's actually a mini of the full sized product so I feel I can factually comment on this as well. 
 So anyway, the casing was a velvety rubber type feeling. Similar to the UD Basics palettes. 
 It has a cool minimalist design with a little carved out spot at the top. It has a true grey coloring and that's about it.

I open it up and use the very sharp point to line my lips per my usual actions. After this I proceed applying it to my lips with the flat end. Then after the center of my lips have more than enough color I press and push my lips together as if attempting to blend the color. Then I use my finger to spread the color to the outer portions of my lips. I do this so I don't use more color than I need a since it can happen so easily with just one coat, let alone anymore than that. Doing it my way it dries quicker, you don't get lipstick on your teeth. There's no blotting your lipstick to get rid of the excess and it lasts a minimum of twice as long. That's double the uses you would normally get. If you don't like the idea of using your fingers than use a lipstick brush. Either way you get more control and get more use out of one tube for the same amount of money.


Bottom line is this lipstick goes on super creamy and rich. It feels a tiny bit oily or slick but that's just how it goes on. It stays in this state for a couple minutes before it dries so you have enough time to get it right. Just make sure you do get it right before it dries because once it dries it's not moving and it's got a completely different feel.

It's for little to no transfer at the 15 min and 1 hour check. Even less at the 1 hour check but there's also some faded color. Honestly I did a lot more with my mouth than most do in an hour so I suspect it to last a while before needing a touch up. I'm thinking about at least a couple hours. This isn't super drying and as I stated in my Melted Mattes post all day wear is something you don't get with these creamy, barely there feeling matte lipsticks.  If you want those won't budge ever until you break it down with an oil based something lipstick than this isn't for you. Unfortunately those lipsticks feel tight and dry your lips like crazy. Some girls even get cracked lips by the end of the day. 

You have to sacrifice whether you like it or not. You want creamy, barely there, moisturizing, velvet type matte lipsticks you have to be willing to touch up a few times a day.
This picture is of the transfer. I kissed my hand firmly after twenty min and this is what came off.
If you want no budge and no transfer semi permanent color you can find it but you have to be willing to feel like all the moisture has been sucked from your lips. They will feel chapped and possibly crack by days end or multiple days wear. A good idea is to keep chapstick on hand for when it gets really uncomfortable. 

I personally am big on comfort. I don't want to feel my lipstick all day long sucking the moisture from my lips and making it feel as if my lips are wearing pants that are three sizes too small. 
Screw dat! Lol!

The Gazpacho color that I'm wearing in all the swatch pictures is really gorgeous. I could see it looking great on every skin tone. Every beauty magazine when I was young told me that with my natural dirty blonde hair, blue eyes, super pale skin with pink undertones I should shy away from reds with orange undertones and stick to reds with blue undertones. Because of this I constantly passed by any color that had orange undertones and tried ever blue red I could find. I hated them all. Then out of the blue (pun intended lol) I get a "free" sample of this orange red lipstick. I had already come to the conclusion that as much as I would love to pull off that vintage pin up look that I would never be able to pull off red lips. I tried this on and I actually liked it. I was so confident in it that I wore it out immediately and got lots of looks from the opposite sex.

 I had no idea this was a matte lipstick since it applied so wet but it definitely is a true matte. One of the most comfortable mattes and beautiful reds I have ever tried. This is my first real introduction to the BITE beauty brand and I am not ashamed to say that I am officially hooked. I can't wait to buy more lipsticks from these guys and considering I don't do more than lipgloss usually that's really saying something!

I definitely recommend you all go out and buy this color and if not this color than this type of lipstick from them and if not the Amuse line than any BITE lipstick because they obviously know what they're doing. Considering I have very unrealistic expectations for lipstick and it has to be perfect if I even consider wearing it, I know everyone else would love it. I believe their lipsticks range from around $14 for the ombre travel duo two pack from sephora to around $24 for a full sized lipstick, give or take a few dollars. 

Update: after 3 hours of eating and sleeping and smoking (ick! I know!) It is pretty faded. There's still some color but it would definitively need a reapplication at this point. Don't buy high end popular makeup from anyone but a reputable dealer. They will most likely be fake. Why get duped to save a few dollars. Instead look out for sales, coupon codes, rewards programs, etc. I explain more about this in a precious beauty blog here. Check out all my blog pages.

Next up is the Tarte Tartelette In Bloom Palette review and tutorial. 

Twitter @snowbunnybeth90 pinterest @callowayelizabeth instagram @buzzybee1990 Facebook @yarnandbeauty
YouTube to come soon!

Like, comment, share, subscribe, and all that jazz!
 Stay beautiful just the way you are! Xo

Below are pictures after 1 hour:


Below are pictures after 3 hours and some sleep:


Too Faced Melted Mattes Review, lip swatches & tips. Is it right for you?


Too Faced Melted Mattes in the color Queen B
Review, lip swatches, tips and is it right for you?

If you read my previous two blogs you know I stopped at Sephora yesterday and today and what I bought. I won't keep repeating myself there. All that stuff and my new Sephora shipment coming on Wednsday will all be reviewed if it hasn't been already along with many tutorials to come. Check out those blogs to see what's coming and what I've already written.

Now I tried on a few shades of the regular or original melted lipsticks. I didn't love the application tip and process or the tube and I'm not sure I loved any of the colors enough to ourchase them. They were sold out of a lot of colors of the melted matte so I didn't get to try on Cool Girl or a couple other shades I had wanted to. They had a couple Queen B's left and I tried it on and didn't feel sure but liked it enough to hurry up and pay for it since my annoyed boyfriend was waiting in the Mini for me.

I've now been wearing it consistently for two days and feel I can adequately show you how it looks and tell you how the performance is. Also matte lipsticks aren't intended for every one. They definitely aren't meant for my lip type but I will get into more about that a little later in this post. 

First off the Melted Matte goes on creamy and bright, as described in all of the ads. It doesn't dry immediately so you have a good thirty seconds to get it in place and off of where you don't want it before it's locked down. The applicator stick is great for lining my lips with the point of it and the wide angled side gives great coverage on the rest of the lip. I really like the normal application tip and I'm so happy they went with this instead of the other lipsticks in the Melted line. As the saying goes "If it ain't broke, don't fix it."  Bottom line is it's beautiful, modern and classy look with function. They knew what they were doing when they made their Melted Mattes. 

 It looks pretty good on. The color is consistent and it's totally opaque, can't see through it at all. It's very even and not too tight. It's actually incredibly comfortable and not at all drying. Since it isn't drying and doesn't stay on all day. When I kissed my hand twenty min later a very small amount came off and when I drank with a straw a big good colored lipstick ring was on my straw. It only lasts a few hours max, even less if you eat, drink, smoke, etc. But honestly I will take a few applications throughout the day if I don't have to end up with dry cracked lips from a formula that doesn't ever come off without an oil based remover like the lip whips formula (haven't had the pleasure of trying them yet but hopefully will soon, just going off their website and other bloggers with that example.).  It does have a creamy soft texture when it's wet and definitely when it's dry. It's almost like nothing is on my lips. When the color is coming off somehow the color doesn't fade until the very end when it's almost all the way off. So that would be the only con and like I said I don't really consider the wear time here a con because of what you would be giving up in terms of comfort if it were longer lasting. 
1 through 10, the higher the number the better the product rates.
Comfort: 8
Color: 8
Wear time: 6
Color transfer (onto drinks, etc.): 5
Price: 5
Packaging: 8
Ease of use: 8
Smell/taste: 9 there's no taste and smell
Amount in package: 7
Would I buy again? Yes
Would I recommend to a friend? Definitely! (Go get some girls!)

Tips, tricks and advice:
Matte lipstick makes a more fleshy looking lip. It even makes the lips look a bit smaller. Matte lipstick is great for a fuller lip but when it comes to small or thin lips like mine it's not a good choice usually.
 For smaller lips a good type of lip coloring is a gloss because it magnifies the lip and makes it look bigger or a glossy or translucent lipstick. Really any lipstick with a shine, sheen, or glitter. It really makes the lip stand out and makes it look bigger. 
Very thin lips should not under any circumstances wear a matte lip. It just looks silly. I know that sucks because matte lips are really in right now, actually matte everything is really in right now but we will just stick to lips for now.  Glossy lips look great. My all time favorite gloss is DiorAddict lip gloss. It makes my lips look gorgeous and fuller. It's a bit costly for a gloss so I usually like smackers lip glosses for their smell and look on my lips, but lately I've been using baby lips lip gloss. It's hard to find a gloss that doesn't serve it's purpose of look great on most lips. If you've got a matte Color that doesn't look good on you try adding a clear or matching lip gloss on top. This may give you a whole new lipstick to love. A lot of us thin lipped girls try lipstick from time to time and feel we can't pull it off for whatever reason. The real reason is that it takes a lot for a lipstick to not look silly on a thin lip. My first tip there is that no matter how popular it gets don't over draw your lips. It looks ridiculous. You can see where your lip ends and that your lipstick goes over and onto your skin. It looks like a five year old did your makeup and that's what everyone in the real world will think as well. It's not cute and that trend needs to die. The most overdrawing acceptable is half on your lip line and half off. The amount is so small it's not even measurable, but honestly your best bet is to avoid that trendy "tip" all together. Find colors that go well with your skin tone. Finding your skin tone and colors to suit you is really easy online. Otherwise just try on colors until you find one you can stand. Then wear it all day and let it grow on you because if you usually don't wear lipstick it will seem weird at first so you will get a better gauge on how it looks after wearing for a while. Next you can use your lipstick as a liner. Use the pointy tip of your lipstick or the pointy tip of your applicator. If using your lipstick as liner make sure to use the lipstick at an angle during application so you always have that sharper edge.

That's all folks! Read my other blogs to find my social media. Rate, comment, subscribe. More coming soon 
Xo

Monday, September 5, 2016

Urban Decay Basics Palette review, neutrals tutorial and mini Sephora haul#


URBAN DECAY NAKED BASICS 1 
Review & tutorial!

So this is what I expected when I purchased this palette. Sounds and looks good right? Seems simple enough. I like the in depth fifteen minutes to do eye shadow alone looks but as a woman and mother I need a quick every day eye look. I have a few but I like to have as many as I can so I don't have to always look the same. So anyway, as I said, this was the idea:


I went to Sephora yesterday and bought this palette after looking at many of the palettes they had and coming to this decision so I could spend $55 on this and a lipstick and not just a palette. I have lots of palettes so it's not like this was my first and only so I didn't need a huge palette.  I also bought a Too Faced Melted Matte lipstick in the color Queen B (review and tips to come soon.). I also spent 200 points on a Too Faced Better Than Sex Mascara sample (review in previous blog.) And a BITE lipstick sample in Gazpacho (review to come soon.). 

So basically I snuck a few uses of this when I was over at my mother in laws. Her daughter is like 21 and has a few high end lipsticks and this is her only high end eyeshadow palette. I looked inside and I thought the colors looked really pretty. I can't remember a time where I seen her wearing it or with much makeup on at all, but then again I don't really look at her so that's not saying much. Anyway, while giving my son a bath in the bathroom where her makeup is I used this palette and her lock it foundation (these times are when I fell in love with the lock it powder of kvd.) And a few high end lipsticks I hadn't had the pleasure of trying since I'm a lipgloss and eyes girl. Lipsticks have been much ignored in my makeup repertoire up until lately. 
So during these times when I needed a serious makeup touch up and nothing on hand her makeup came to be a life saver. I used her Naked Basics 1 on two different occasions and I liked it a lot. Admittedly, during these test it days I was wearing other makeup that had faded in close to the same colors so I guess I wasn't getting a great idea of how it worked but I really thought "how much of a difference could a little rubbed off makeup in the background make?". Well, turns out a lot. 

I will post pictures below this paragraph to prive what I found and that after looking I seen it in other peoples swatch and looks pictures. This palette was horrible. I'm a big Urban Decay shadow fan. Actually, I like most of their makeup. I just bought their anti aging eye primer today! This palette unfortunately left a lot to be desired. It could probably be made to work with a lot of dips in the pan to get the color and a lot of blending but honestly for $30 dollars for the amount of shadow that it is I'm just not willing to work that hard and even if I was the colors leave a lot to be desired. Despite this I made a tutorial below anyway but first let me explain in a little more detail what the actual problems were. I don't use drugstore eyeshadow since over the last two years I have invested in quite a few palettes so I can have a good variety of colors and finishes. The palettes I own are Naked palette 1 and 3, Smashbox Full Exposure, Cargo Northern Lights, Too Faced Bon Bons, and Kat Von D Serpentina. These are just the ones I use often and these are the palettes I'm comparing the quality too because this is the quality I'm used to. If this basics palette is the first high end palette you've used or bought ever or in a while and you mostly use drugstore makeup I can see how your opinion may differ from mine. 
The problems:
The colors are extremely powdery with an abnormal amount of kick up and fall out and even with primer and moisturiser still looks very powdery and falls out all under and around eyes. All colors in palette do this. Kick up is expected when using a brush of any kind, but more with some brush types than others. A lot of makeup users are under the mistaken impression that there should be no pick up or fall out. That is usually the case with drug store makeup but when dealing with most high end powders they are extremely fine milled powders. The ease of which they come off the pan and brush is a good thing and so is some kick up but sometimes it's too much if there's an extremely fine milled powder that isn't buttery at all and is just powdery. If that's the case, as it is here, you're lucky if most of it makes it to or stays on your lid. 
Next and possibly the worst problem of all the colors are extremely streaky. That's if you can get the color to show at all because the pigmentation down to the very darkest color sucks balls. When you look at the pictures below you can see that the color is never even on swatches or on the eye. Whether you use your finger, a brush, primer, no primer, tips, tricks, etc. Doesn't matter. As I said above the only way to combat this is to use a ton of product and blend for hours. Let's hope your eyes don't fall out in the process. I personally wasn't willing to waste my time when I'm spending that kind of money vs. The amount of product I'm actually getting. To use it correctly I would have maybe gotten twenty uses out of it before I started running out of color.
Again, the pigmentation is horrible. The second, third and fourth color all barely show up at all and if I could make them it's with a ton of product. I'm a very light skinned girl with pink undertones. Anything will show up on my skin except for this so I imagine it's worse on everyone else. The highlight is ok but it doesn't have as much of a highlight as I would like. I would think of this as being more of a base color. The two darkest (the last two colors.) Colors are horrible. The second to last being the darkest brown is ok but it's so streaky I can't stand it. The black is not what I would consider a black. It's like a see through black if that makes any sense and since I like my darkest color to double as a liner this wasn't cutting it for any possible uses. 
The staying power sucked. With the Mary Kay Eye Primer I had been using before I purchased today's primer it stayed in for maybe a couple hours before the streaks got so evident that it was embarassing and I had to add colors from other palettes which just made it look more muddy. Unfortunately that was my second idea of a use for this palette. Using it as transition colors or adding other palettes to this palette look for a Better look but with how muddy and gross it looked I wasn't wasting any more time on this.
There's nothing good about this palette. I hated it. The foxy color is kinda pretty, the small travel sized palette would be great as a take along for day to day or travel, it closes tight and the silky rubber type feel of the casing is cool along with the understated design. Unfortunately though, none of those things could save this palette from being returned for me. I wouldn't recommend to a friend and I wouldn't ever try another Basics palette. 
I returned it for an exchange on the Tarte Tartelette In Bloom Palette and just paid the difference since it was worth it for more colors, more quantity in weight and shadows and way more quality. For $15 more dollars it's a lot better deal. I haven't got to use it yet but the swatches are beautiful. I will review and add tutorials for that soon. 
The basics tutorial starts below but first here's the problems I found even in other bloggers pictures and with my own experience:

First here's the proof of the lack of pigmentation and the extremely streaky color both on swatches and on the looks. This palette in the first picture below is the "NB" on the left. 


It took a ton of product and blending for the above look and the streakiness in the crease is still evident.


The pigmentation sucks. I guess if you want to spend more than $30 with tax and maybe shipping on one natural, barely there look and that's your thing than go for it. Last but not least:

Look at how much product has to be used in these swatches for a uniform look and color. You can see it's so thick. Also the extreme powdery look is so obvious. Not sexy. 

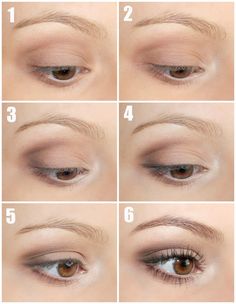
Here's the tutorial. I'm not sexy because it was a hot, sweaty day and I didn't retouch these photos at all because I want you always to see the products I use for exactly how they are. So let's begin:

Step one: wash face, add foundation or concealer on eye from lash line to eyebrow. Then do eyebrows and then add base shade. The second shade lightly with a fluffy brush from lash to brow.

Step two: use your fluffy brush to add the third shade from the left, so the third darkest shade. Use a windshield wiping motion. It doesn't need to be perfect or clean. We will clean up later.


Step three: add the fourth darkest shade, fourth in from the left to your fluffy brush. Start with small circular motions in your outer third then blend with windshield wiper motion in same as before. We will be coloring our crease from end to end of crease unless stated otherwise.

Step four: add fifth darkest shade, fifth shade from left, to your fluffy brush and put it in your outer third. Now blend into crease and a little outward towards hair line.

Step 5: with fluffy brush add darkest shade, creep, into outer v and then blend into outer third only then add foxy with a shadow brush into inner two thirds. Make sure any harsh lines are blended. Use the third darkest color on top of the crease again to blend any streaks or harsh lines.

Step six: add creep to your angled or straight edgge liner brush and draw a wing. Keep adding color until you get the look you want. Add liner on top of this isn't dark enough.

Step seven: add mascara, foundation, contour, highlight and blend. Then highlight under eyebrow and inner eye corner with first shade in palette, the highlight shade. Add lipstick if desired. Products I used are;
& Anastasia Beverly Hills brow duo brush #14 for liner
&UD Basics Palette 1 
& Benefit My Brow pencil in #3
&Too Faced Melted Matte lipstick in Queen B
& KVD ink liner in trooper
& KVD Lock it powder in Medium 54
Barely used any because now that I quit tanning it doesn't match so I only just barely cover up my flaws with it until my new color gets here on Wednesday in my Sephora shipment.
& Too Faced Better Than Sex Mascara
& Loreal Telescopic Mascara since as I've blogged about before layering two different mascaras gives a huge lash look.
& Cover Fx Contour kit in light
& Bobbi brown concealer duo for under eyes and on eyes as a base
Yes my acne is showing. I was not going out and I would be in bed in a couple hours so trying out the basics palette was the main focus. Here's the look:


Twitter @snowbunnybeth90 pinterest @callowayelizabeth Facebook page is yarnandbeauty Instagram @buzzybee1990
Youtube to come soon.
Mirroring blogs at
Yarnandbeauty.blogspot.com
Yarnandbeauty.wordpress.com


Too Faced Better Than Sex Review and unretouched photos

 Too Faced Better Than Sex Mascara Review!


So I've been saving up my point's at Sephora for idk what. Something great I guess. Problem is whether it's online or in store the "reward" you get for a minimum of $100 spent is really anticlimactic. I had over 400 points so at the end of my purchase the saleswoman asks if I want to spend any of my points. She kindly points out that I can pick any four items I want. They are all so tiny I almost don't want to waste my points on that. Honestly though I know it's always going to be that way so I look at the five options for the 100 point purchases. Remember $1 equals 1 point. They have some tiny skin care samples, a Better Than Sex Mascara Sample and a lipstick sample. The skin care sounds great but I know that two uses at most won't give me any sort of results from the skin care so I don't waste my points or my time on that.  I pick the tiniest lipstick sample. BITE beauty lipstick in Gazpacho. I also picked out the Too Faced Mascara. She bags up my purchases from my tiny Sephora Haul and then slips my samples in the cute white and black gift bag. She then slides out this flat drawar with no sides with decorative tissue paper and calmly but carefully grabs a piece and places it so perfectly inside the gift bag that includes my pricy purchase of which I have high expectations. For the $54 I spent on two things I felt a lot better after opening the bag and seeing four items. Obviously for the majority of us quality is better than quantity but it doesn't change the fact that $54 isn't chump change and it was nicer to see more product in the bag. Even if half of those items were free and almost so small they were nearly invisible lol.

 I get in the car and try on the Too Faced Melted Mattd lipstick in Queen B. I will do a review on that soon. I then hurry home and wash the makeup off my face so I can "play" with my new toys! I run to my bedroom and rip the tissue out of the bag and grab each thing swiftly. I then set everything side by side perfectly on the top of my dresser. I primer my face and eyes with moisturizers and primers and oil control lotions, etc. Then waving my hands, fanning my face, trying to hurry the drying process along because I'm so happy that I have these things. I'm like a kid in a candy store and I can't wait any longer to try this stuff out. I open all the boxes and slowly feel and look at each item again setting them perfectly side by side like I've got OCD. 


 I do my makeup as usual, than I open the UD Basics original palette and start doing my makeup. I then line my eyes and then add my foundation. Now after all of that I'm ready for the mascara. 

 I add one coat.

I'm pretty disappointed in the performance. Than I remember that I would never just use one coat of any mascara and that I shouldn't be so quick to judge before I'm finished. 

I add a second and third coat on one eye. I love long, thick, dark, blackest black lashes. It's one of the things I love most and changes my entire look with the right lash look. I'm pretty disappointed at this point. I grab my old faithful Loreal Telescopic and puf that on the other eye in two more coats. So now one eye has three coats of better than sex. The other eye has one base coat of better than sex and two coats of telescopic. Using two different mascaras has always been my go to anyway because it gives a look that you can't get from any one mascara. You must try it.


It's super easy. You put your first coat on of your thickening or plumping mascara. Then repeat on the next eye. Go back to the first eye and use your favorite blackening, colorful and/or lengthening mascara. Repeat on next eye. Add one more coat going back and forth if need be. You can use any of yiur favorite mascaras. Try different combinations to find your favorite.

My Telescopic mascara did the job much better. I like really long, plump, and black lashes. Those are the things that are important in my mascara, and while this Better Than Sex mascara is nice it just wouldn't be something I would spend over $20 on. It's got a cute design, has a soft black color, has a nice shaped and thick brush. Unfortunately I'm willing to say that this is mostly looks. I know a lot of people love this stuff and honestly if you already have great lashes added just want a little color and a tiny bit more thickness this would probably be perfect for you. I personally like the look of extreme lashes where I get asked constantly whether they are real or not. My perfect combination of mascaras for this is Telescopic as base maybe with primer underneath and then a couple coats of Diorshow mascara. If it gets chunky brush it out to seperate the lashes. The Telescopic brush is perfect for this. 

 Bottom line is it's ok if I were in an emergency situation. I will probably keep it in my purse for that since it is travel size but no, I wouldn't buy it or recommend it to anyone wanting major performance from their mascara. 
Same concept!

 I made another purchase in store at Sephora today. I got the Tartelette In Bloom Palette. I can tell you now that I swatched every palette at least reduce the last two days and this definitely had the best feel, performance and pigment. Let me see how it wears and I will come back with a tutorial and review within a few days. I have a ton of product reviews and tutorials coming up the next few days and my shipment from Sephora is coming in on Wednesday so follow me anywhere to keep up. I also bought Urban Decay Anti Aging primer so stay tuned for a primer off and reviews on the three primers I own.

Add me at Pinterest @callowayelizabeth twitter @snowbunnybeth90 like me on my Facebook page yarnandbeauty, check out my mirrored blog at yarnandbeauty.wordpress.com. YouTube videos are all I have left to add so stay tuned for that.

Comment, like and share.

Stay beautiful because you are!