TARTE TARTELETTE IN BLOOM PALETTE REVIEW AND TUTORIAL!
If you've read my previous blogs from my most recent Sephora purchases you know that I initially chose the Urban Decay Basics Palette despite the fact of swatching every palette in store (except the basics palette.) And loving the In Bloom Palette the most I didn't purchase it because I thought from my previous trys that I liked the Basics Palette and would get a good amount of use from it and it was also half the price of all the full size palettes which I have a ton of already. So anyway, that was a horrid decision and I took it back the very next day (the review on that is a few blog posts previous to this one.) And just paid the difference for the In Bloom Palette which was only a $15 difference at $45 USD. Of course I only made that Decision after swatching every palette I didn't have.
On this day I was trying to choose between the original Tartelette, the In Bloom and the original Too Faced Chocolate Bar. I had recently purchased and fell in love with the Too Faced Bon Bons Palette and I had been planning on buying the Semi Sweet but not the original Chocolate Bar because the Semi and Chocolate are too similar to spend $100 to have both. Alas, the Sephora store I was at didn't carry the Semi Sweet and as I said they are almost identical so I considered it but after feeling the buttery feeling of the shadows, especially the Amazonian Clay Formula Of the Tarte Palettes, seeing the pigment after blending, comparing the total amount of shadows per cost of palette and seeing the variety of color I chose the In Bloom (obviously.) Because it had some shimmer shades unlike the original Tartelette and more of a variety of colors. They are also so buttery and go on so smoothly it feels like silk. They blend amazingly without looking muddy together. Streakiness was not a problem at all. Not even a little bit. I love the big mirror and the weight of the palette. The shape, design, and closure method are perfect for travel without having to worry about it falling apart or open in your bag and getting all over everything or the shadows breaking. The design on the front is literally gorgeous! It's like a floral watercolor painting with gorgeous spring colors. In bloom is the perfect name for this palette. The colors are reminiscent of nature and flowers and there are so many different options for Looks you'd probably run out of the palette before you ran out of different looks to try with it.
The palette is great for beginners and those in a makeup slump where you're always choosing the same look and same colors. It comes with a insert with two seperate tutorials for two different quick and pretty looks. Obviously if this was it I wouldn't exactly say that it's newbie friendly but the palette is arranged in three rows. Each row across has colors that are similar in order to make another three easy looks. That's six looks that you can do without even thinking. If you're a little more daring you could use the four rows that go straight down for four more eye looks easy.
That's great for starting out but with this palette please feel free to express yourself and experiment a bit. The ease of use that this palette provides makes it perfect to experiment with. All the colors generally fit together so there's no risk of looking like a clown and you can feel comfortable straying from the original direction that this palette provides you.
This is definitely a palette I will most likely purchase again unless it's limited edition. I'm not sure if it is but palettes usually are so let's hope that's not the case here because I'm in love with this palette and it's great for day and night. Occasion makeup and day to day makeup. It has a perfect liner color called smokeshow that makes this palette a full look palette. You could use a lot of these as liners but that's a perfect darker color.
I would definitely recommend you buy this palette than come back and try this tutorial. This vanilla scented palette truly is one of a kind in a sea of boring neutral palettes that are all the same
Tutorial for In Bloom Palette Look:
For every look when using blending brush in crease we use windshield wiper motion with brush.
In Outer V we use small circular motion.
When blending we use windshield wiper motion.
When applying eyeshadow we pay the color on with the brush.
We pay the shadow in the inner corner.
We use a drawing motion to draw a straight line with shadow under eyebrows and for liner with liner brush.
All of these rules constantly apply unless otherwise specified.
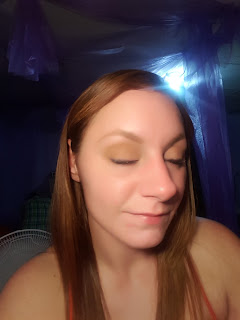
Step one: take your fluffy brush and pat the color Flower Child all over lid and crease.
Step two: take your fluffy blending brush and some of the color Smarty Pants and put it in the crease and just above the crease. Blend.
Step three: with your fluffy brush grab the color Sweetheart and put in crease. Same place as last two colors. Blend.
Step four: with fluffy brush grab some of the color Rebel and put in your outer V then blend into the crease.
Step six: with shadow brush gently tap the color Firecracker all over inner two thirds of lid almost to inner V.
Step seven: with your fluffy brush grab Jet setter and blend everything out in your crease and inner V with this color.
Step eight: with your fluffy brush and a small amount of the color Activist and put it in your outer V and outer two thirds of crease very lightly. Blend so there's no harsh lines.
Step nine: with shadow brush grab a small amount of the color smokeshow and draw a v following your inner V with the color and the brush lightly. Do not use a heavy hand. This needs to be perfect. Don't make a mess since it's a very dark color and cleaning it up on the inner eye would wipe off all the work we have done. After this blend with your fluffy brush in small circular motions in the outer fourth of your eye. Basically just blending that outer v to blend out the sharp lines. Always blend outwards towards the hairline.
Step ten: with your shadow brush use a small amount of firecracker on the lid just to cover up any dark shade too far over on the lid.
Step 11: grab your liner brush and use the color smokeshow to line your upper lash line and upper water line and make a small wing. Then line the bottom lashes only and no further over only where the lashes are.
Step twelve: use two seperate mascaras to make your lashes look big or just use your normal mascara routine.
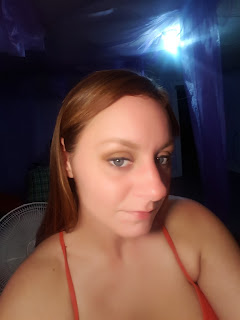
Step thirteen: with the color Charmer and your fluffy brush swipe under your eyebrows to the top of the crease shade to lighten everything up and blur the lines of the top crease shade. Then add that color to your inner eye and inner eye corner and bottom waterline on the inside and end right before the lashes start. Grab a smaller shadow brush and the same color and make a perfect line right underneath the bottom of your eyebrows for definition.
Step fourteen: finish your face makeup. I contoured, blushed, highlighted, lipsticked.
Products I used for full face are:
#Benefit perfect my brow #3
#Tarte Tartelette In Bloom Palette
#Loreal Telescopic Mascara
#Too Faced Better Than Sex Mascara
# Diorshow Maximizer Lash Primer
#Bite Beauty Amise Bouche Lipstick in Gazpacho
#Cover FX Contour Kit in light
# Bobbi Brown Concealer Duo
#Makeup Forever Hd Blush #210
# Anastasia Beverly Hills Brow Duo Angled Brush #14 for liner
#Sephora Large Blending Brush #27
#Cargo Northern Lights Palette Brush for eyeshadow brush
# Kat Von D Lock It Powder Foundation Medium 52
I just got my shipment from Sephora two days ago. I got the Makeup Forever HD foundation, Kat Von D Lock It Foundation in a lighter color, Diorshow Mascara, Anastasia Beverly Hills Glow Kit in Sundipped and Anastasia Beverly Hills Liquid Lipstick in Crush. Swatches, Reviews and Tutorials to come within a few days.
Twitter @snowbunnybeth90 pinterest @callowayelizabeth instagram @buzzybee1990 Facebook page yarnandbeauty blogs are yarnandbeauty.blogspot.com and yarnandbeauty.wordpress.com!
YouTube coming soon!
Add, follow, like, share, plus one, and all that jazz!
Stay beautiful because that's what you are!
Xoxo


No comments:
Post a Comment